Camera Alignment
Significant Changes in LightBurn 2.1
LightBurn 2.1 introduced a new camera system, with new features, a new interface, and new calibration and alignment processes. Information from earlier versions of LightBurn may not apply in LightBurn 2.1, and information for working with cameras in LightBurn 2.1 may not apply to earlier versions.
After calibrating your camera's lens to correct for distortion, you'll need to go through the Camera Alignment process to tell LightBurn where your camera is positioned relative to your machine's work area.
Unlike the lens calibration, which is only based on the camera and can be reused when you move the camera, the Camera Alignment needs to be redone each time you move the camera, although it can be reused if you're migrating to a new computer and haven't changed the position of the camera in your laser.
What if I use more than one camera?
If you have two or more overhead cameras in your laser to better cover a large bed, align each camera separately. To make this easier, you can select the Two Zones preset when you get to Pattern Setup. You can edit the size with the controls at the bottom of the window or by dragging the edges around.
If you're using a head-mounted camera instead of the more common overhead cameras, skip ahead to Head-Mounted Camera Alignment. The process is similar, but there are some differences.
Skip to Head-Mounted Camera Alignment
Open the Camera Alignment Wizard
There are a few ways to open the Camera Alignment Wizard outside of creating a new camera:
- Click the Alignment button for the camera you want to align in the Cameras Window.
- Click the Align to Workspace button in the Edit Camera window.
Before You Begin
- Select the correct camera in the Cameras window.
- Calibrate your camera lens.
- Make sure your camera is mounted where and how you want it mounted for actual use.
- Make sure you have laser-engravable material to burn the test pattern on. The material should be big enough to burn a pattern that fills most of your workspace.
- Place your material into the laser and focus your laser to the material.
Quick Start
Need more help? Jump ahead to the full directions.
- Select your alignment method. Automatic alignment is faster and easier, but if you don't have good lighting or can't get a good high-contrast mark, you may need to go with manual alignment instead. The Alignment Wizard will show you an overview of the steps you'll need to take.
- Set up your alignment pattern, following the on-screen directions, then click Next to move to the next step.
- Make sure your material is centered in the laser bed and the laser is focused. Burn your alignment pattern, following the on-screen directions.
- You can adjust your Speed and Power directly from the Alignment Wizard, use Import to select a setting from your Material Library, or click Settings to open the Cut Settings Editor.
- Use Preview and Frame to make sure your alignment pattern will burn where and how you expect, and start your job as usual with the Start or Send buttons.
- The Machine Control section in the bottom left will let you jog and home your machine.
- After burning your pattern, do not move the material. The location of the pattern needs to remain unchanged.
- Follow the on-screen directions to complete the alignment procedure, then click Next to continue.
- For the Automatic Alignment process, you may need to adjust camera settings and lighting to make sure at least 4 tags are detected.
- For the Manual Alignment process, you'll need to double click to indicate the crosshairs in order.
- Check that the alignment appears correct in the preview, and either click Next to save the alignment or Discard to try again.
- Success!
Walkthrough
More detailed help on completing Camera Workspace Alignment.
1. Prepare Material
As described above, you'll need to have a suitable large piece of material, appropriate cut settings for a crisp, dark mark, and your camera securely mounted in the location you want to use it from.
2. Open the Camera Alignment Wizard
There are a few ways to open the Camera Alignment Wizard outside of creating a new camera:
- Click the Alignment button for the camera you want to align in the Cameras Window.
- Click the Align to Workspace button in the Edit Camera window.
3. Select your Alignment Method.
You can use automatic or manual Camera Alignment. The automatic method is quicker and easier, but requires good lighting and high contrast between the marked pattern and the background material.
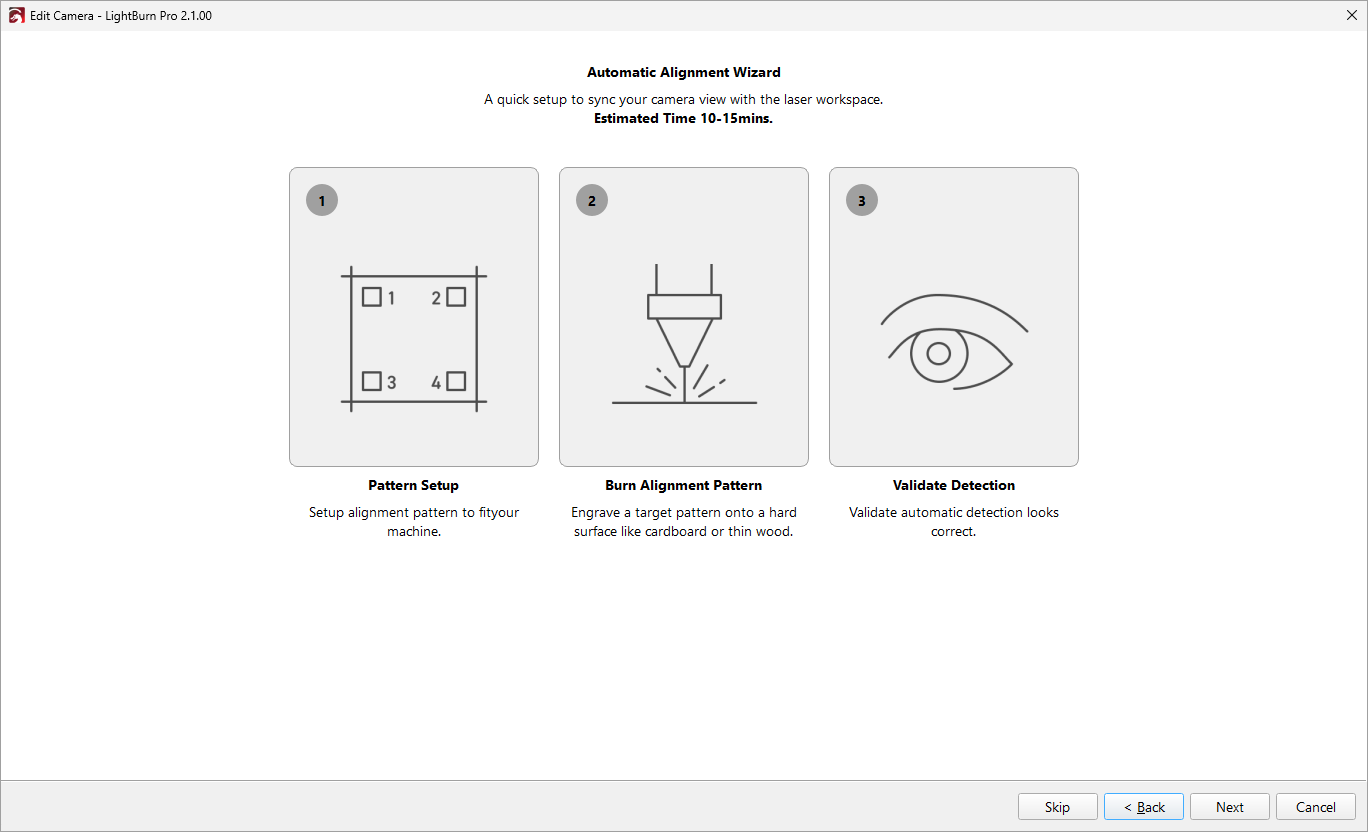
Overview screen for automatic alignment.
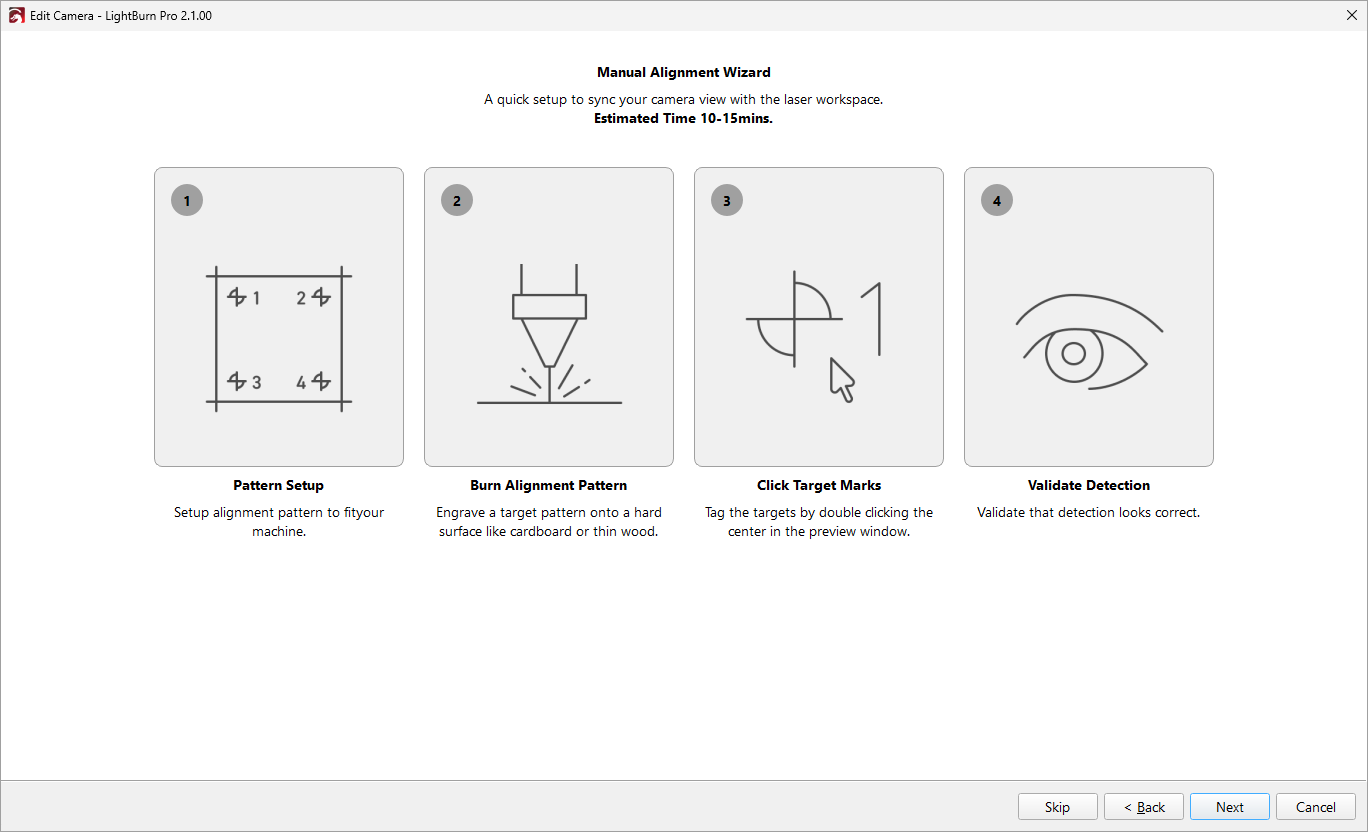
Overview screen for manual alignment.
4. Set Up Your Alignment Pattern
Next, you'll set up your alignment pattern. The screenshot below is from the Automatic Alignment wizard, but the only difference for Manual Alignment is that there are no AprilTags - all the settings work the same between the two.
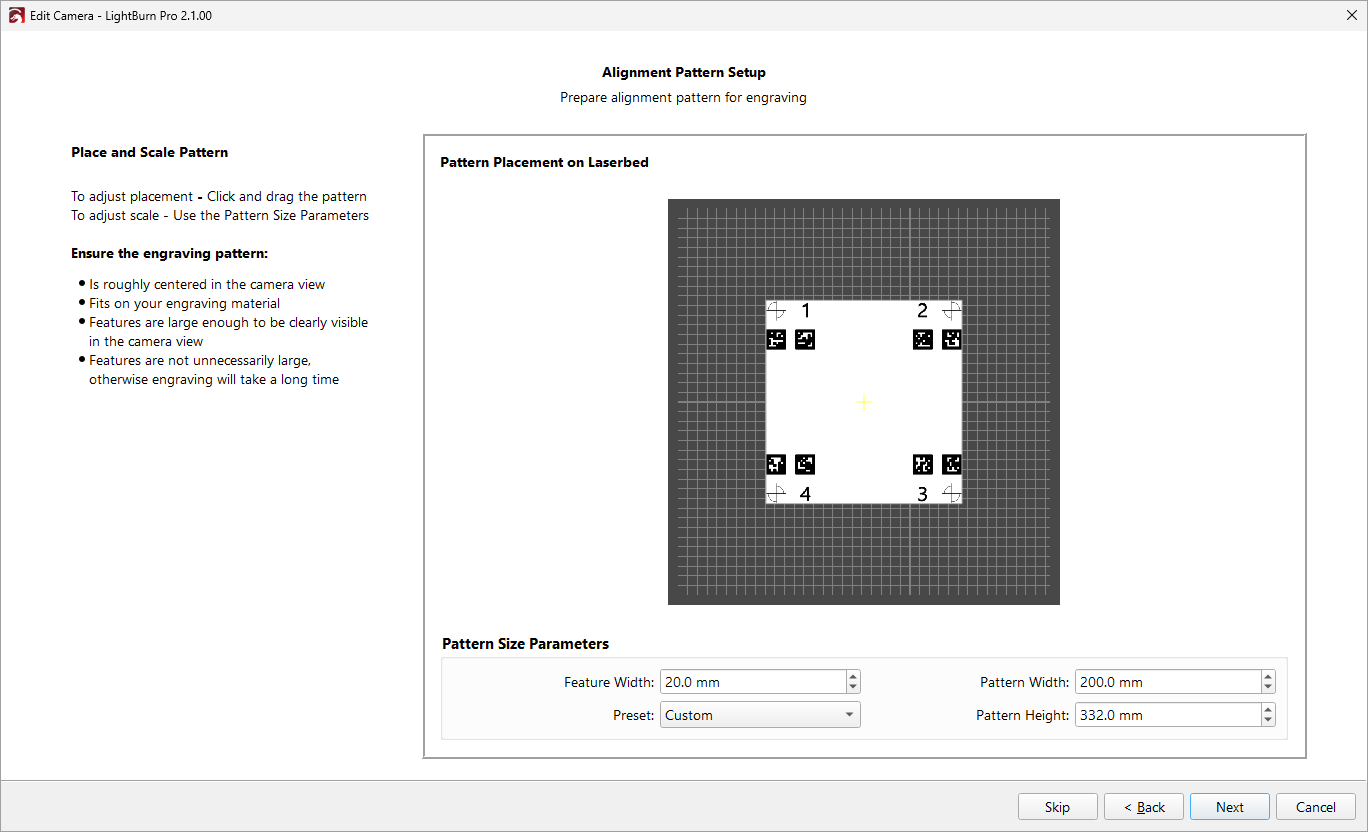
Place and Scale Pattern
When creating the pattern, it should be:
- Roughly centered in the camera view.
- Sized to fit on your engraving material.
- Created with features large enough to be clearly visible in the camera, but not so large they take an excessively long time to engrave.
Pattern Size Parameters
- Feature Width: The size of the calibration features.
- Pattern Width / Pattern Height: The width and height of the overall pattern.
- Preset: You can choose one of several presets as a starting point. To go back to the defaults, you can select Center from the dropdown.
5. Burn Alignment Pattern
Place your material in the laser cutter and get ready to burn the alignment pattern.
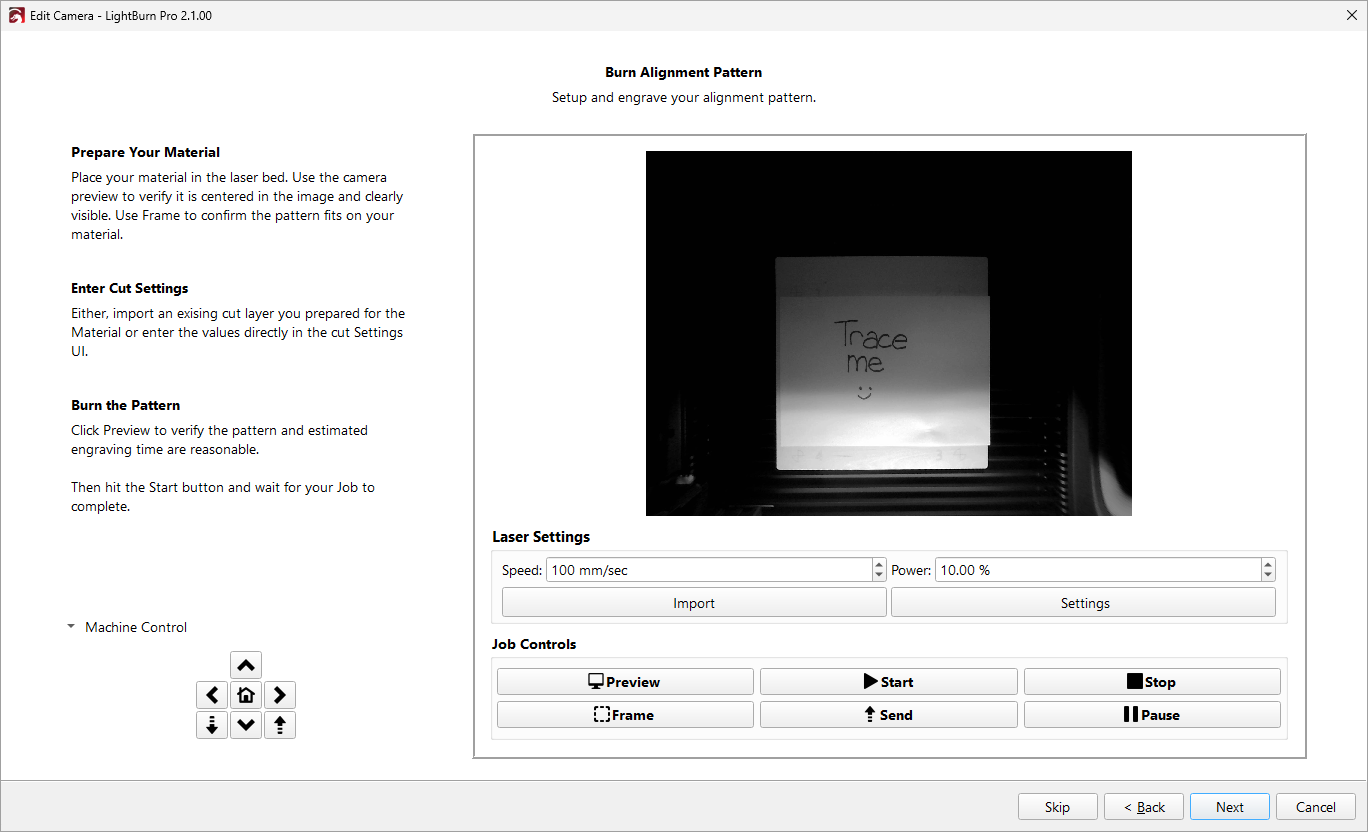
Use the camera preview to make sure the material is near the center of the image and clearly visible. Use Frame to make sure the pattern fits the material, and use Preview to see what will actually be burned. Use the Machine Control section in the lower left to move your laser head around if needed.
Adjust your cut settings to engrave a dark, crisp mark without cutting through the material. You can adjust your settings in a few ways:
- Adjust speed and power right in the Alignment Wizard window, just below Laser Settings.
- Click the Import button to load a layer from your Material Library.
- Click Settings to adjust your layer settings in the Cut Settings Editor.
Run the job using Start or Send, however you'd usually control your laser.
Do not move the pattern after you burn it, or you will need to burn a new alignment pattern.
6. Target Alignment
Depending on whether you chose Automatic Alignment or Manual Alignment, you'll see one of two screens.
Automatic Alignment
Automatic Alignment uses the camera to read the AprilTags you've engraved and automatically calculate the placement of the camera relative to the material.
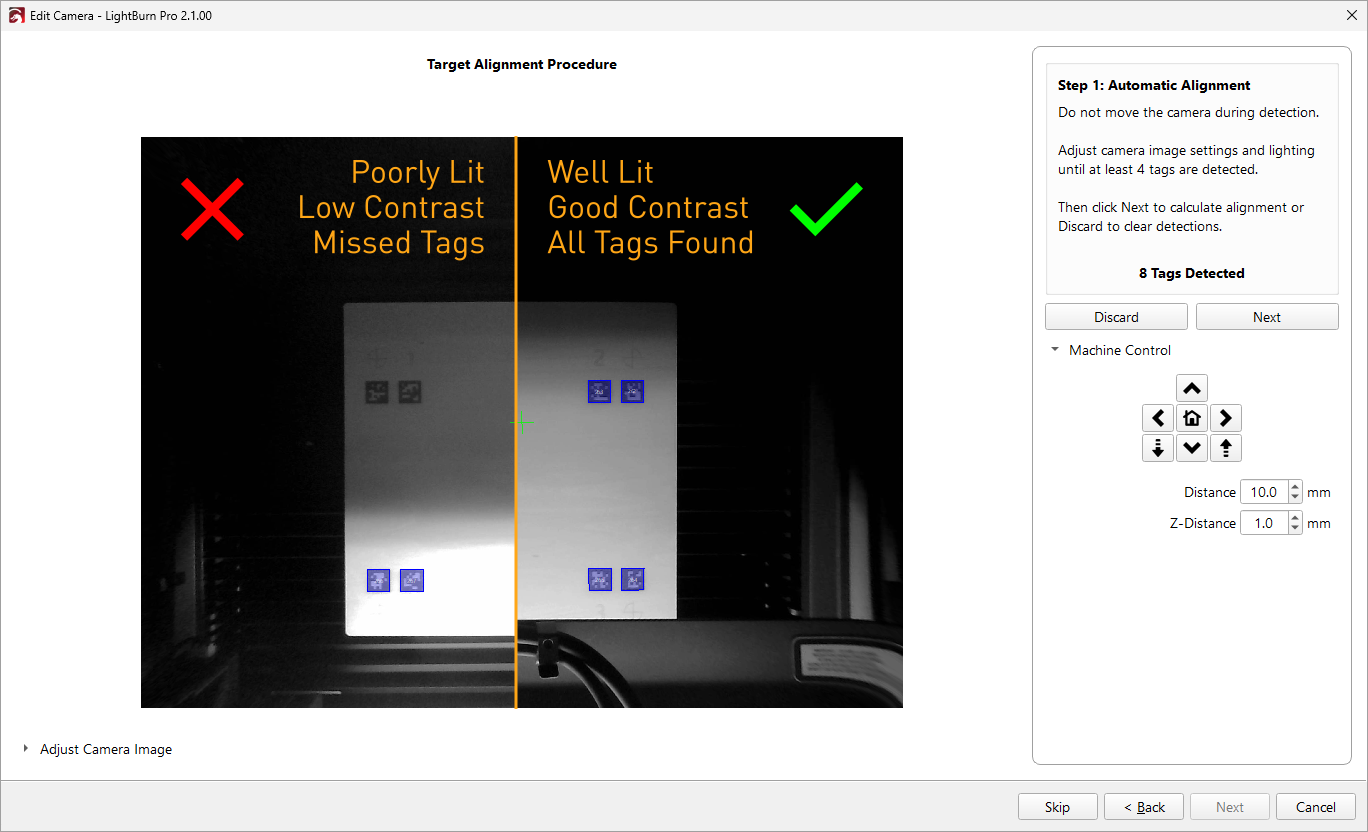
Getting good results with automatic alignment
Because LightBurn is attempting to read the alignment pattern for you, it's important that you have good lighting and clean, high contrast engravings. See the screenshot above for an example of poor lighting/contrast on the left, and improved lighting/contrast on the right. If LightBurn is not detecting the tags, you may need to improve the lighting or adjust the camera image with the Adjust Camera Image controls in the lower left corner.
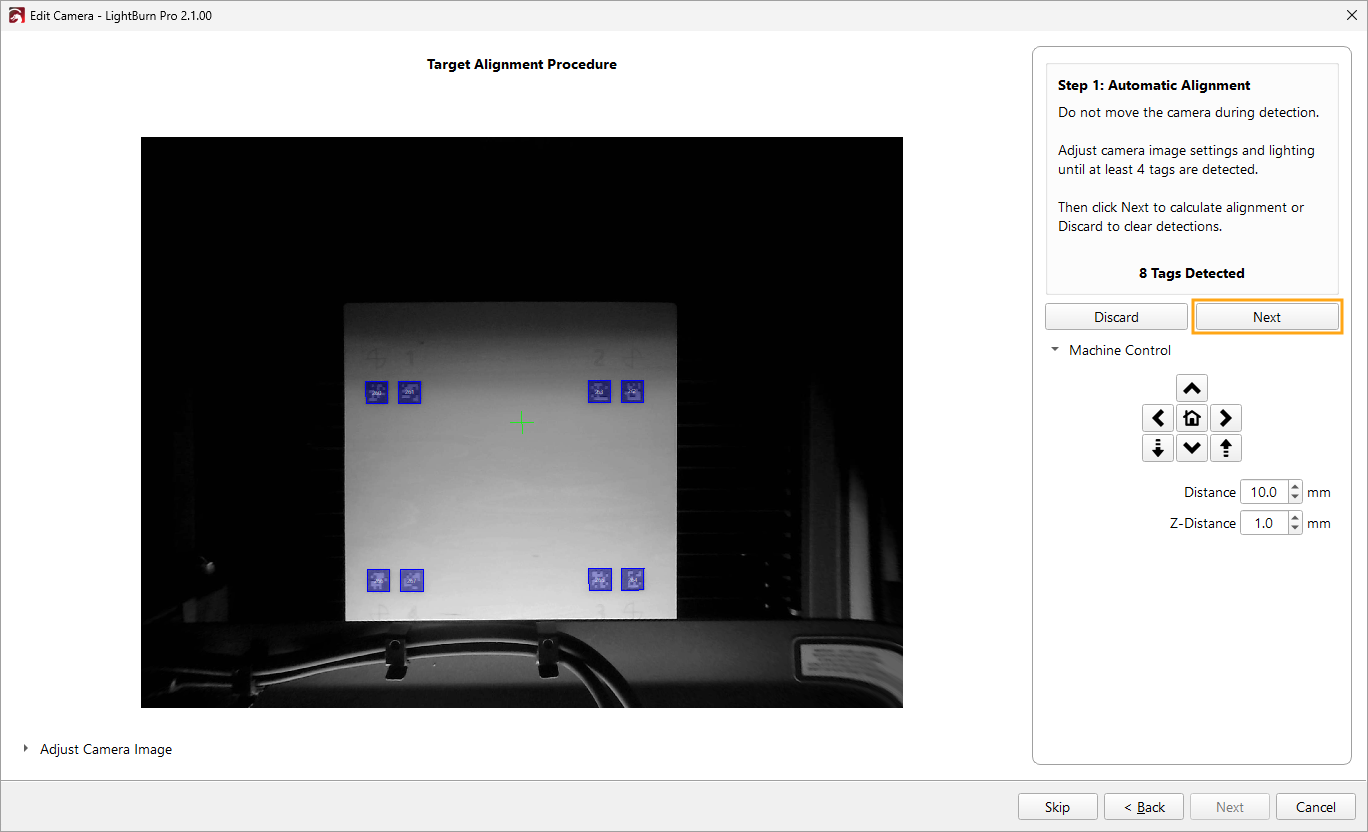
To start, LightBurn will attempt to detect the tags burned into the material. For automatic alignment to work, LightBurn needs to be able to detect at least 4 of the 8 tags you've engraved. You may need to use the Machine Control section or Adjust Camera Image section to make sure the image is clear and unobstructed.
What if LightBurn can't detect the tags?
If LightBurn is unable to detect the tags, you can switch to manual alignment. Click the Back button until you get to the screen where you chose between Manual and Automatic alignment, switch to manual, and continue on from there. As long as you don't move the pattern and don't exit the alignment window, you can still use the crosshairs on the alignment pattern without having to burn a new one.
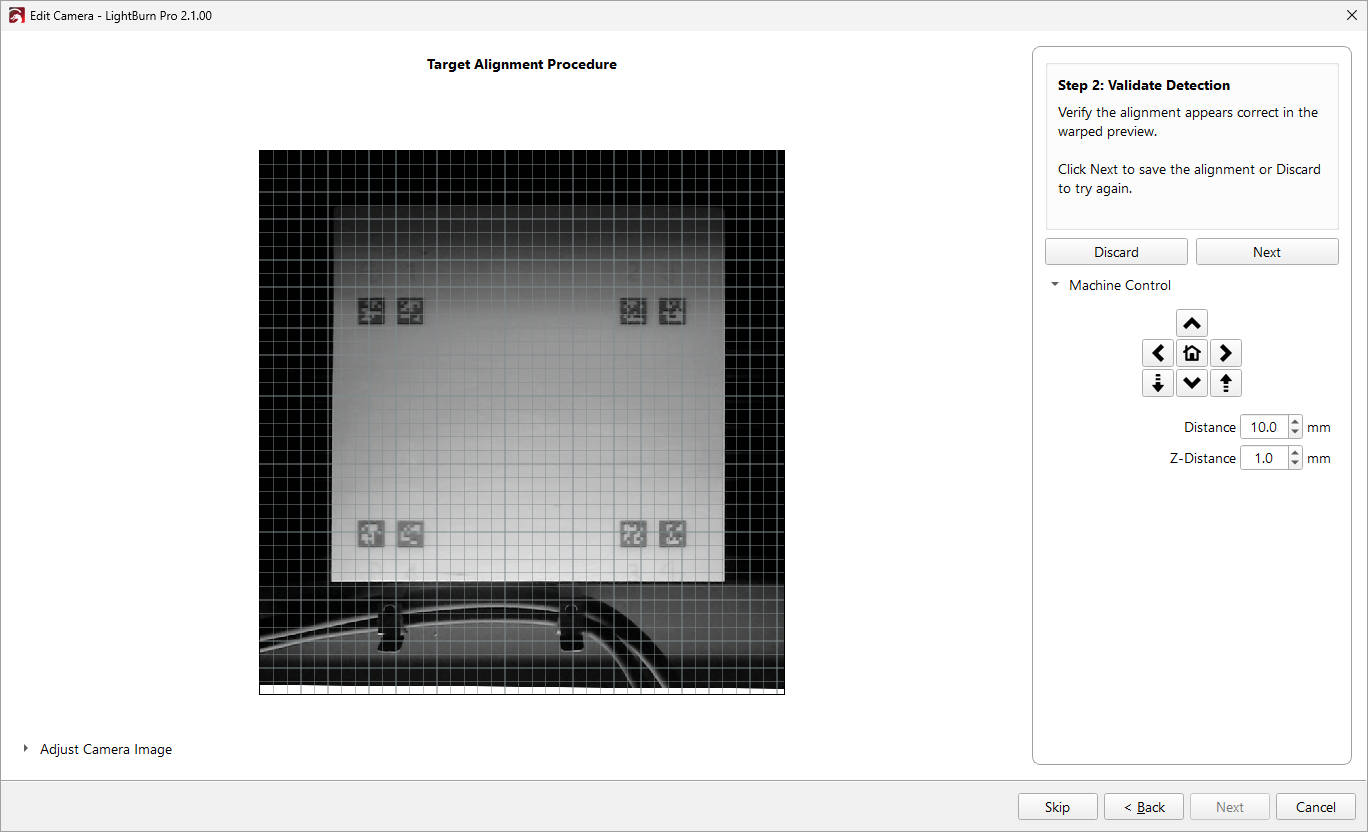
Next, you'll validate LightBurn's alignment results, making sure that the alignment looks correct. Use the grid lines to help you make sure straight lines appear straight, and rectangles do actually look like rectangles. If you're satisfied, click Next and then Finish to save your alignment. Otherwise, you can try using the manual alignment process
Manual Alignment
If you're unable to use Automatic Alignment, or just don't want to, you can also use the Manual Alignment process. Manual Alignment does the same calculations does the same calculations as Automatic Alignment, but requires you to identify the center of four crosshairs engraved onto the material yourself. If you aren't able to get a clear, well-lit, high-contrast alignment pattern or if your camera is particularly low resolution, you may need to use Manual Alignment.
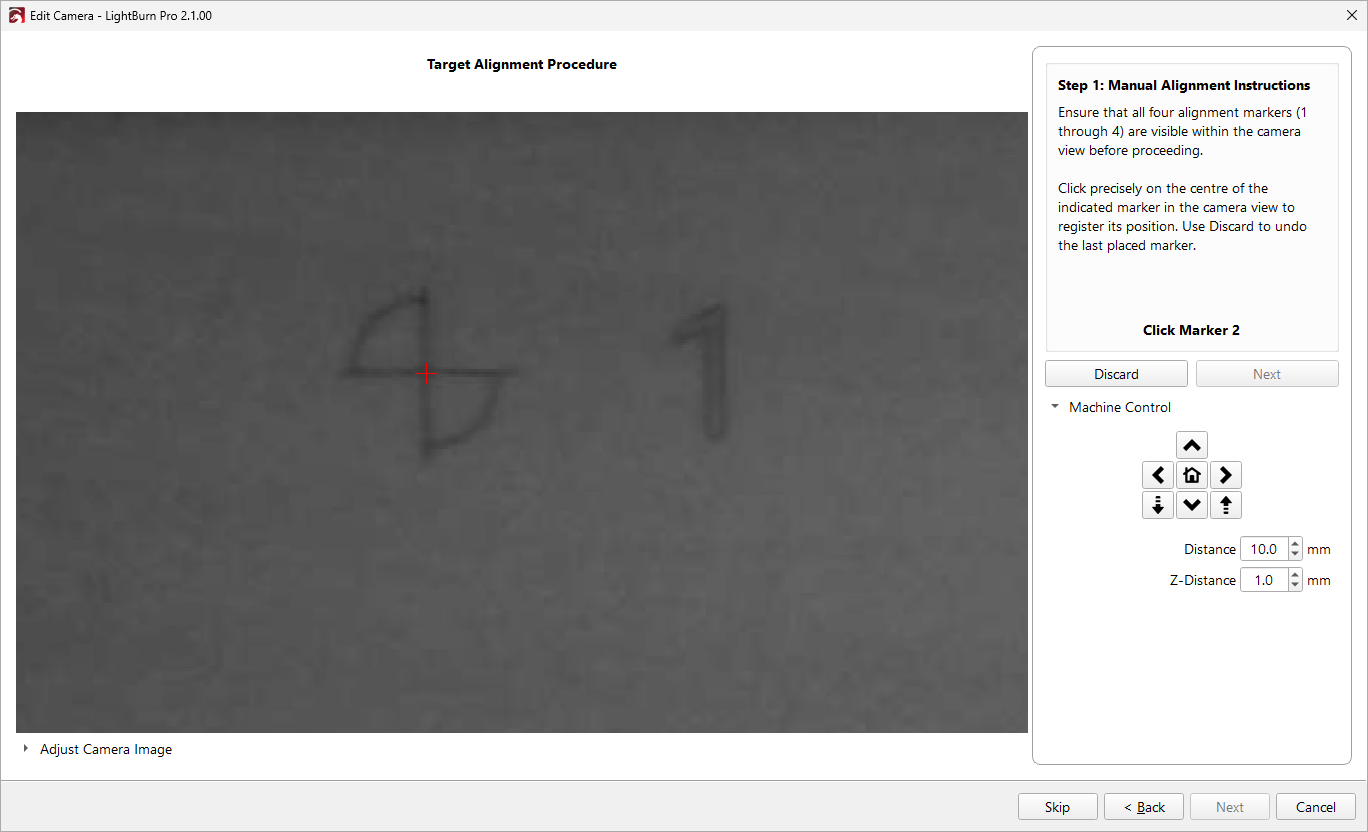
Tip
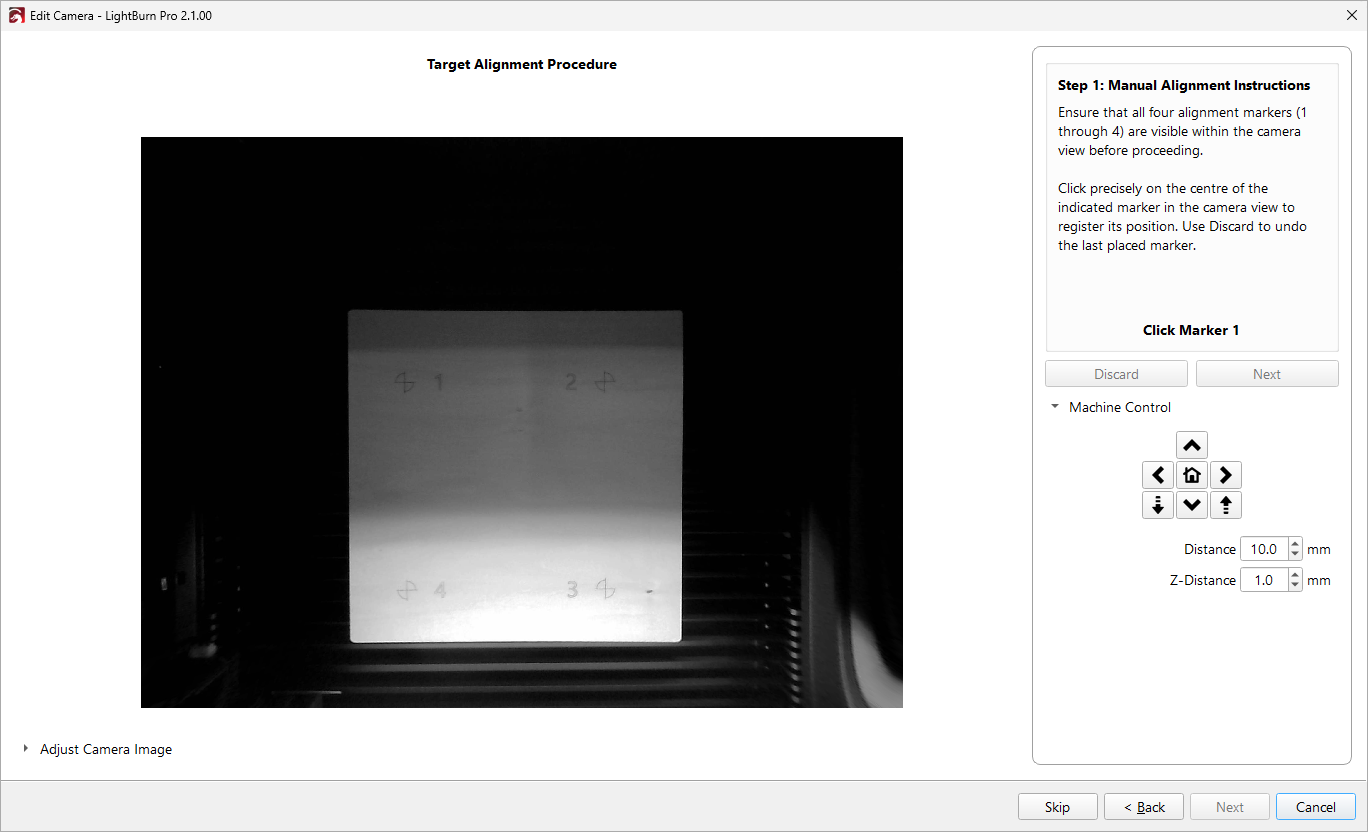
Trying to do this looking at the entire camera image will be both difficult and inaccurate. Use the scroll wheel to zoom in and out on the camera preview so you can see and select the center of the marks more easily.
LightBurn will start by showing you the camera view. You'll need to identify the exact center of the crosshairs - where the two lines meet. Click the center of each target in order. Press the Discard button to remove and redo a center mark.
Repeat for all four corners in order, following the on-screen directions.
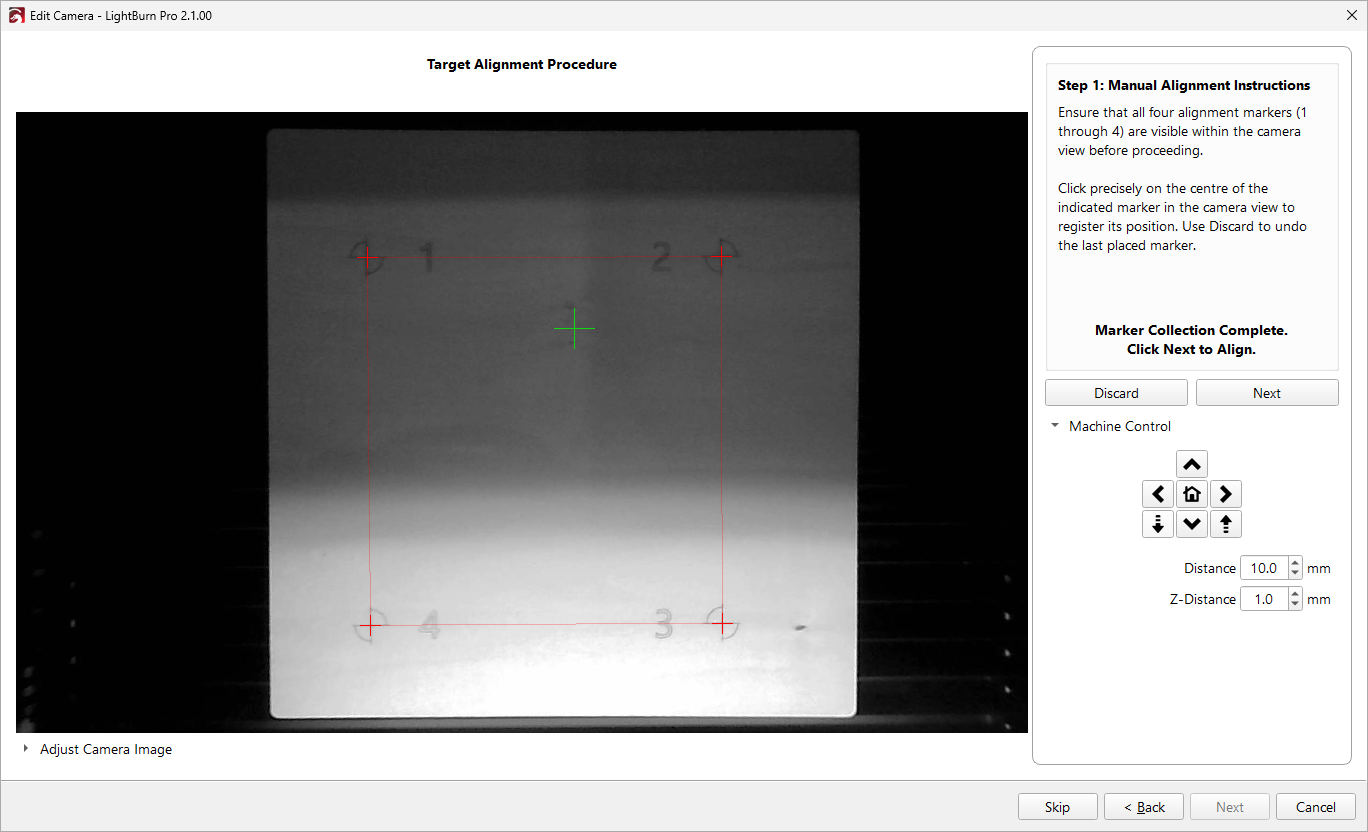
When you're done selecting all four manual targets, you should see something similar to the screenshot above, with red marks at the center of each crosshair, and red lines connecting each corner. Click Next to continue onto validation.
Finally, you'll validate LightBurn's alignment results, making sure that the alignment looks correct. Use the grid lines to help you make sure straight lines appear straight, and rectangles do actually look like rectangles. If you're satisfied, click Next and then Finish to save your alignment. Otherwise, you can click Discard and try again.